Today I’m looking at images from The Mobile Darkroom, a project by Shane Arsenault and Natalia Barberis. They’re shooting Harman Direct Positive, a photograpic paper that produces a positive image directly without needing a negative, in a 16×20 view camera. (Their site is down currently, it was at https://www.themobiledarkroom.ca).
Arsenault and Barberis have me thinking about scene reproduction. Specifically, how important is it to maintain image detail through a wide range of subject brightnesses? Spend some time with their images. They’re beautiful. Direct Positive is quite contrasty and they’re shooting outdoors where the range of luminances definitely exceeds the range of the paper. Most of the images have large areas of deep, flat blacks and completely white whites. This would be a no-no for a zone system fanatic. But Arsenault and Barberis make it work by carefully placing the midtones and letting the brights and darks fall where they may.
Do these photographs perfectly describe the subject of the scene? Nope. But we get the feeling of the place and how the light falls there from every single one. I find the work really appealing and inspiring.
Laurent Girard is a master black and white printer based in NYC. I just discovered his astonishing blog, A Printer’s Life. I’m not going to try to tell you who he’s printed for. The list is too big to comprehend. He writes like beat poetry. It’s frantic. Here’s a taste.
“then the developer, i don’t change the timing there either for the same image, got to keep consistent. always agitate the same way. and i look at the first black coming up, at different time for different papers. drain really well, always the same amount, dip in the stop bath -99% glacial acetic acid- for 30 sec to a minute, agitate, then drain well -you don’t want to mix acid and hypo too much all day long, it gives off bad fumes- and the fix is just a formality at this point (even if it was the toughest chemical to figure out in the invention of photography). i say a formality because after you agitate a couple times you can turn the light on (print face down). the light you turn on to look at the print should always be the same. if i change that -or until i’m used to it in a new darkroom- i can’t print properly. once i know my in-darkroom viewing light, i can tell the dry-down exactly. i close my eyes to get used to the change dark-light-dark for a few seconds each time.”
Read the whole blog. There are golden nuggets strewn liberally throughout. But don’t forget to take breaks. The posts are relentless.
Inspired by Steve Yedlin‘s work with cinema film, I’m going to try to characterize the look of Instax film. I’ll then apply the look of that photochemical process to digital photographs. This project will be ongiong as I dig through the data and build a model to simulate the film.
In order to understand how Instax represents various colors at various brightnesses, I shot an exposure wedge of an X-Rite ColorChecker target. An exposure wedge is a sequence of images shot at different exposures, ranging from very dark to very light. This is what it looked like when I finished.
The ColorChecker is useful because it provides a consistent ranage of flat color patches. Between the primary (red, green, and blue) and secondary (cyan, magenta, and yellow) patches, lie all the other more more sublte colors. I’m hoping to discover or invent a way to use those primaries and secondaries to reshape the digital colorspace. The grey patches on the bottom row will help track neutral colors. The top two rows represent common colors like skin tones, pastel colors, foliage, and blue sky. They will become useful later as I fine tune the model.
I shot the exposures with a Lomo Instant Automat. The Automat’s onboard meter assumes that the scene in front of the camera is average because, well, that’s how onboard meters work. So I made my scene as average as possible. I made a really big grey card with a piece of plywood and some 18% grey paint. This card fills the camera’s field of view and helps the meter set a consistently correct exposure. I taped my ColorChecker and a few other references in the middle of it and chcecked that the lighting was even from top to bottom. That white paper on the desktop is a big bounce card to fill in the bottom half. I ended up only one third of a stop different from top to bottom.
The camera was pointing right at my big grey card, so it handled the normal exposure with no problem, but without manual exposure controls I had to trick it do the overexposed and underexposed steps. I cut 3″ squares from Rosco half-stop, full-stop, and two-stop neutral density gels. To get underexposure, I held the gel over the lens to cut the amount of light getting to the film. For overexposure, I held them over the meter’s photocell opening to trick into thinking my office was very dark. I layered two gels to get to three and four stops. This gave me an exposure wedge that goes from 3 stop underexposed to four stops overexposed.
Now that I have the prints scanned, it’s time for some hard-core numerical analysis. I’ll start that in the next post, but we can already see some interesting artifacts as we compare the exposures.
As we might expect, we see the greatest saturation around normal exposure and it reduces as we go towards underexposure and overexposure. Yellows and oranges (a.k.a. skin-tone hues) seem to be doing pretty well in both underexposure and overexposure. This makes sense in a film tailor-made for selfies. Greens drop out after 1 stop of underexposure and shift toward orange in overexposure. The darkest colors, blues and purples, are taking a beating in underexposure. They don’t really show up at all until the normal exposure. These non-linearities that are built into Instax film would be hard to identify in normal photos, but our ColorChecker provides a useful reference for identifying them.
Cinematographer Steve Yedlin has been doing some super cool work on how to prepare digital images so they look like they were captured with film. Maybe you’ve heard of him, maybe you haven’t. I knew his work from Brick and Looper even though I didn’t know his name until recently. I’m very much looking forward to seeing his work on the new Star Wars movie.
Yedlin loves film, but he doesn’t believe in “the mystery of film.” He believes film has specific artifacts that can be isolated, modeled, and simulated. According to him, as long as you find all the artifacts and model them accurately, you can then recreate the “look” of film using digital cameras.
Have a look at Yedlin’s Display Prep Demo. In it, he compares cinematic images shot on film with digital footage that he prepared to look like film using the techniques he’s developed. See if you can pick which clips are film and which are digital. I sure can’t. He claims that nobody has been able to pick which is which with any sort of consistency.
VFX artist and supervisor, Todd Vaziri (@tvaziri), wrote up a great introduction (which is sadly no longer available on Storify) to Yedlin and what he’s getting at with film modeling.
Yedlin has done a bunch of writing on his web site and on Twitter (@steveyedlin) about film and color. There’s a lot of detail that that I’m glossing over here. Definitely go read it from the source. I especially recommend On Color Science for Filmmakers. Here’s a taste:
“When filmmakers with brand allegiance to celluloid deride digital acquisition as having a recognizably bad video look, they’re absolutely right in describing a survey of what they’ve seen in the past. But the reason they’re right is not the reason they often proffer, which is that film enjoys some sort of magical privilege that digital is perpetually barred from. It’s simply because many filmmakers today who use digital formats unquestioningly accept the standard methods of display preparation which are rooted in video engineering and not photographic richness. The two recognizable looks being compared (the “film look” and the “video look”) are merely the most stereotypical of pre-packaged display recipes for each camera-type, not mutually exclusive attributes enforced by the camera or film-stock brands.”
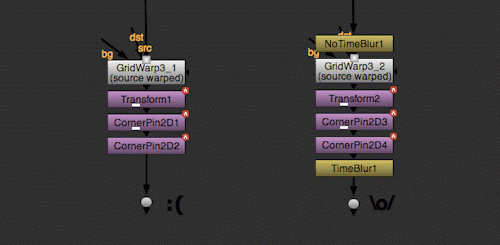
Last week I needed to concatenate the motion blur for a SplineWarp, a Transform, and two CornerPins in Nuke. The Transform and the CornerPins, of course, concatenate beautifully once you make sure they are all using the same filter and motion blur settings. But the SplineWarp doesn’t. In fact, it doesn’t even have a motion blur option. Bummer.
I worked around this problem by using a TimeBlur node. Wrapping the stack of transforms in a NoTimeBlur/TimeBlur sandwich gave me motion blur concatenation for all four nodes. It also let me turn off motion blur on the Transform and CornerPin nodes. This made me happy because motion blur on the CornerPin is slow. The default of 10 divisions was a little overkill for my application, so I turned it down to 5 and got a bit of a performance boost.
Don’t forget to add the NoTimeBlur directly upstream from the nodes you want to TimeBlur. If you don’t, you’ll be doing expensive fractional frame processing for the entire node tree u